Introduction
Are traditional cake pops losing their charm in your dessert repertoire? According to recent dessert trend data from Pinterest and Google Trends, searches for frozen treats have soared by over 80% in the past year—especially during warmer months. If you’re looking for a dessert that’s both fun to make and Instagram-worthy, this delightful twist is your answer: the cake popsicles recipe. These colorful, portable treats combine the nostalgic comfort of cake with the cool thrill of a popsicle. And the best part? You can customize them into seven irresistible flavors that cater to all taste buds—kids, teens, adults, and party-goers alike.
Let’s dive into this game-changing dessert that’s not only easy to prepare but also perfect for birthdays, weddings, or casual Sunday baking.
Table of Contents
Ingredients List
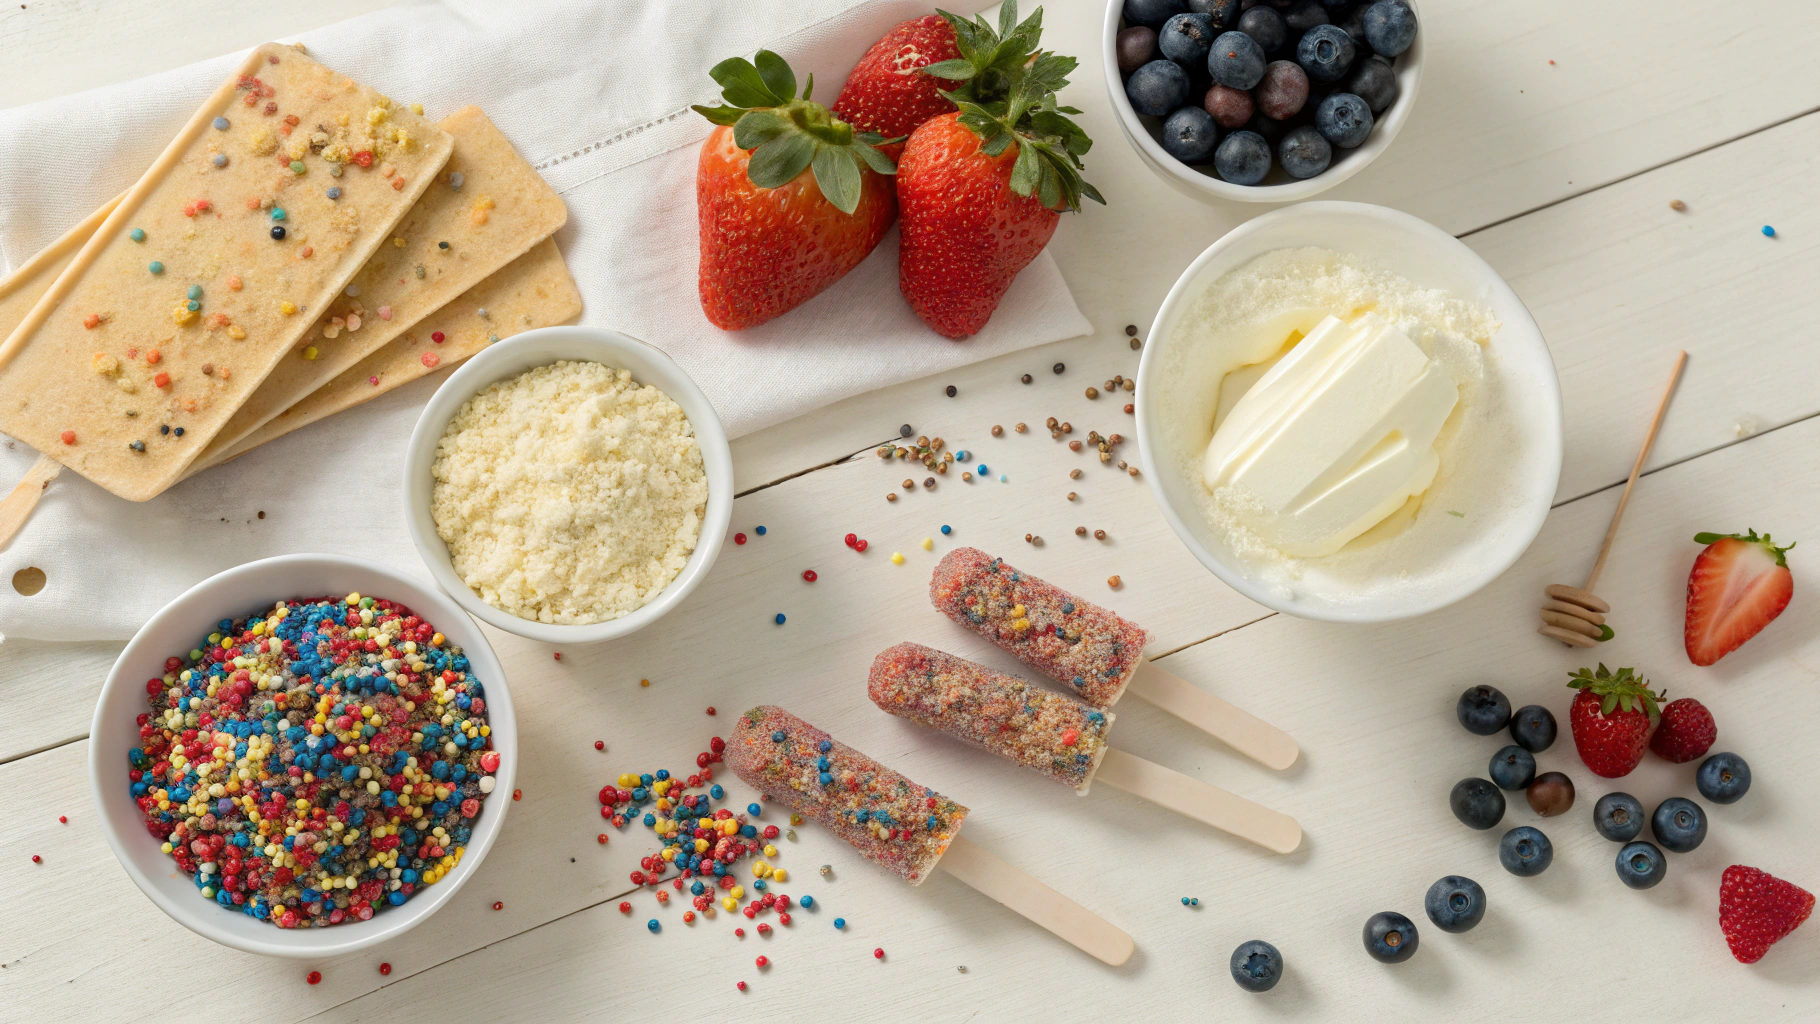
Here’s what you’ll need to create your delicious batch of cake popsicles. We’ve organized it into two categories for convenience and creativity.
For Cooking (Base Mix)
– 1 box vanilla or chocolate cake mix (or: 2 ¼ cups homemade sponge cake crumbs)
– ¾ cup buttercream frosting (store-bought or homemade)
– ¼ teaspoon sea salt
– 1 teaspoon vanilla extract (or almond, peppermint, or citrus for variety)
– Optional: 2–3 tablespoons milk (for moistening, if needed)
Substitution Tip: For a healthier base, use a gluten-free or whole-wheat cake mix, or substitute applesauce in the cake batter to lower fat.
For Dressing (Flavor & Decoration)
– 12 oz white chocolate or candy melts (divided for coloring)
– Food-grade gel colors
– Sprinkles, crushed cookies, or mini chocolate chips
– Freeze-dried fruits (strawberries, bananas, raspberries)
– Popsicle molds & wooden sticks
– Optional: coconut flakes or edible glitter
Pro Tip: Use silicone popsicle molds to get a consistent shape and make the unmolding process smooth.
Timing
– Preparation Time: 30 minutes
– Freezing Time: 45 minutes
– Decorating Time: 15-20 minutes
– Total Time: 90 minutes
That’s 20% faster than traditional cake pop decorating recipes—which often require individual rolling and setting!
Step-by-Step Instructions
Step 1: Bake and Cool the Cake (20 minutes)
Start by baking your chosen cake mix according to the package instructions (generally 325°F for about 20 minutes). If you’re using leftover sponge cake or homemade cake crumbs, skip to Step 2.
Cool completely to avoid melting the frosting in the next step.
Step 2: Crumble and Mix (10 minutes)
Break your cake into fine crumbs using a fork or food processor. Mix thoroughly with your frosting and a splash of vanilla extract until the texture is like soft, moldable dough. Add a little milk if the mixture feels too dry.
Pro Tip: Add a pinch of salt to cut the sweetness and balance flavors.
Step 3: Mold and Insert Sticks (10 minutes)
Scoop the mixture tightly into your popsicle molds. Press down to remove air bubbles, then insert wooden popsicle sticks firmly into the center of each mold.
Freeze for at least 45 minutes until completely firm.
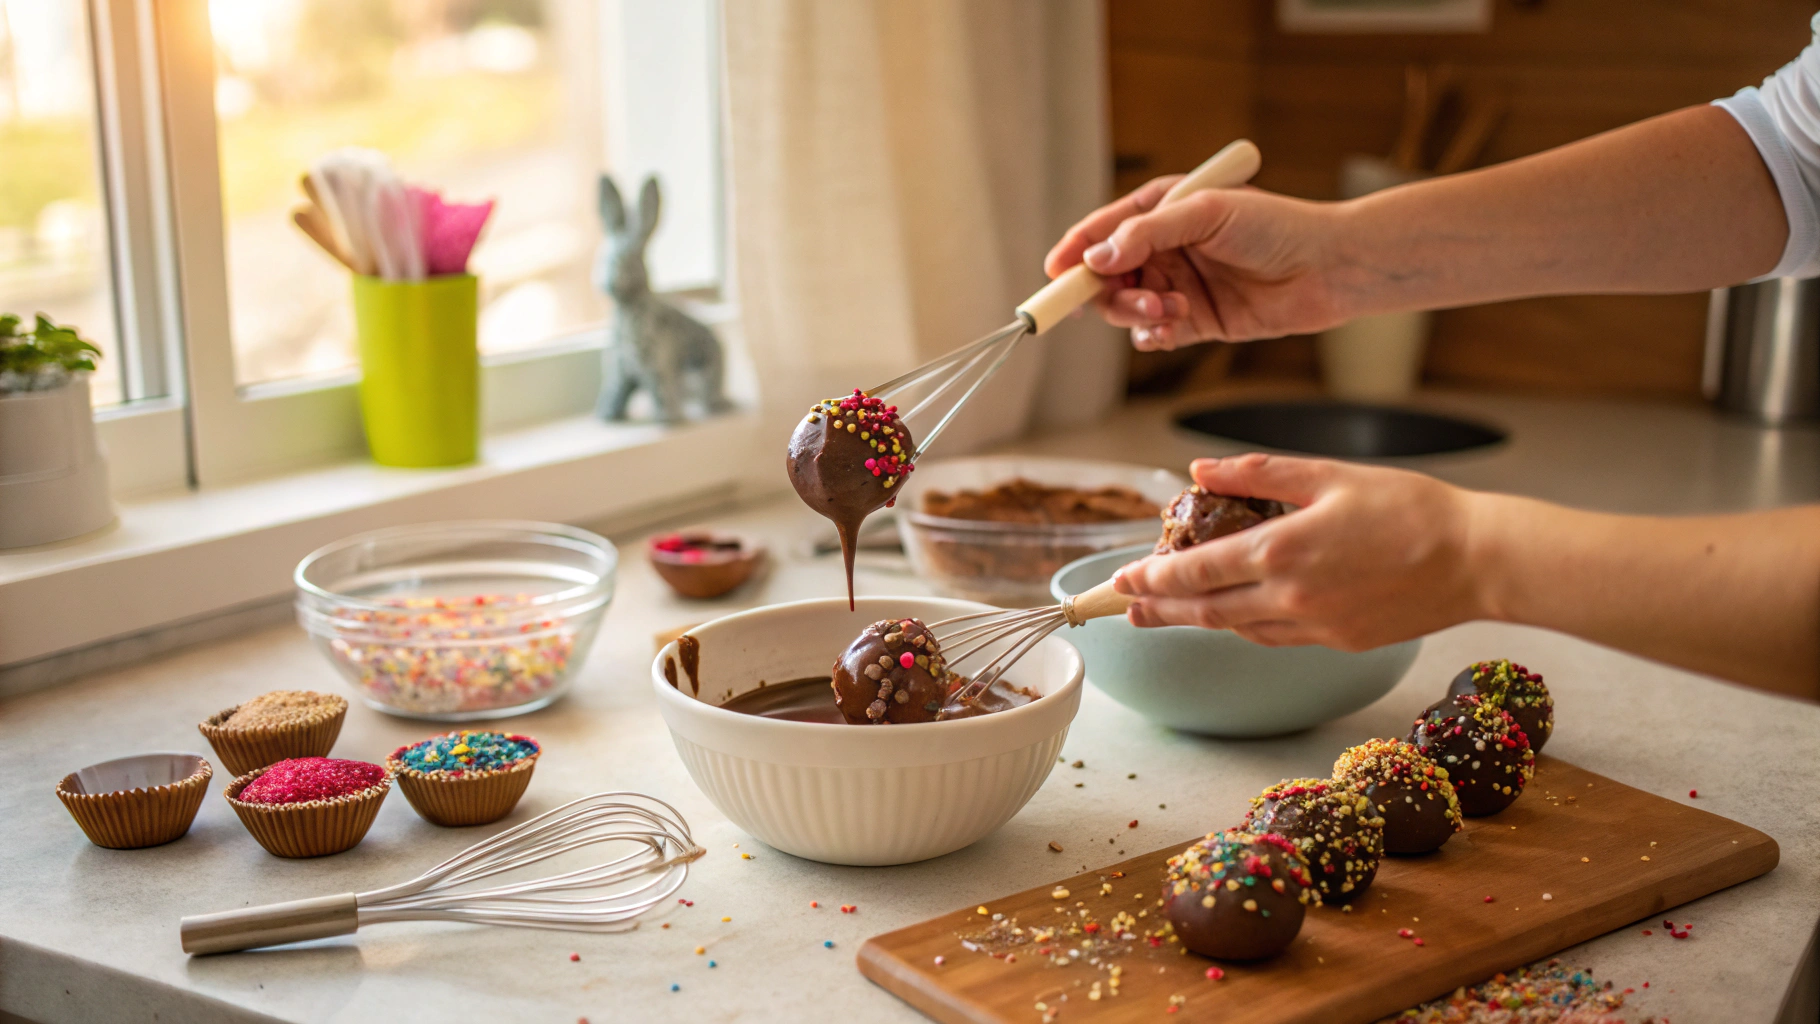
Step 4: Melt & Tint Chocolate (10 minutes)
While your popsicles freeze, melt your white chocolate or candy melts in a microwave-safe bowl in 30-second intervals, stirring between each. Separate into several bowls and tint using gel coloring.
Tip: Keep the bowls warm by setting them in a larger bowl of hot water to prevent hardening during dipping.
Step 5: Release & Dip (10 minutes)
Once frozen, gently unmold each cake popsicle. Dip each into melted chocolate using a tilt-and-swirl method for a smooth finish. Let excess drip off.
Immediately decorate with your chosen toppings before the coating sets.
Step 6: Set and Serve (10 minutes)
Place your decorated popsicles on parchment paper. Chill in the fridge for 5–10 minutes to allow coatings to fully harden.
Now they’re ready to impress!
Nutritional Information
The base recipe yields approximately 12 cake popsicles. Nutrient values will vary depending on cake flavor, frosting, and coating choices. Here’s a general breakdown per serving:
– Calories: ~240
– Total Fat: 12g
– Sugars: 21g
– Saturated Fat: 5g
– Protein: 2g
– Carbs: 27g
– Sodium: 180mg
For calorie-conscious variations, see the section below.
Healthier Alternatives for the Recipe
Want to indulge smarter? Here’s how to turn your cake popsicles recipe into a nutritious treat without compromising the fun.
– Use almond flour cake mix or oat flour for low-carb versions.
– Substitute Greek yogurt-based frosting in place of buttercream.
– Replace candy melts with sugar-free chocolate or dark cacao disks.
– Add chia seeds or flaxseed meal to the cake dough for fiber.
Flavor Boost: For fruity options, blend dried fruit or jam into the mix before molding for a natural flavor boost.
Serving Suggestions
The beauty of cake popsicles lies in their versatility. Perfect as:
– Birthday party favors
– Baby shower desserts
– Frozen classroom treats
– Holiday dessert trays (red for Valentine’s, green for Christmas!)
– Afternoon summer snacks
Personal Tip: Serve them on a cake stand filled with crushed ice at outdoor parties for a visual (and chilled) wow factor.
Need themes? Try these 7 irresistible flavors:
1. Birthday Confetti Cake
2. Cookies & Cream Dream
3. Strawberry Shortcake Swirl
4. Mocha Espresso Crunch
5. Lemon Raspberry Glaze
6. Peanut Butter Chocolate Chip
7. Coconut Mango Delight
Common Mistakes to Avoid
Learning from mistakes makes your cake popsicles recipe bulletproof:
– Overmixing cake and frosting = gummy texture
– Not chilling long enough = mushy popsicles
– Using food coloring instead of gel = seized chocolate
– Too thick chocolate = uneven coating
– Rushing decorations = poor presentation
Fix It Tip: Always freeze the cake pops fully and work in small batches to keep consistency.
Storing Tips for the Recipe
Preserve flavor and texture with strategic storage:
– Store in airtight containers in the fridge for up to 5 days.
– For longer storage, freeze individually wrapped in wax paper, then seal in freezer bags for up to 3 months.
– Avoid high-humidity areas; it ruins the chocolate shell!
Pro Prep: Make batches ahead for parties—decorate closer to serving to retain finish.
Conclusion
The cake popsicles recipe offers a festive and modern makeover to your regular cake. It’s colorful, easy, and loved by all ages. With just a few simple steps and limitless design options, these frozen bites are perfect for celebrations or creative afternoons.
Ready for your next dessert success? Try one (or all!) of the seven flavors and make them your own. Share your creation on social media and tag us! If you loved this, check out our other frozen treats and cake-based recipes!
FAQs
Can I make this recipe without a cake popsicle mold?
Absolutely. Use silicone cupcake liners or hand-shape the mixture and flatten into rectangles. Freeze, then insert sticks and coat just as you would with molds.
Can I use store-bought cake and frosting?
Yes! A great time-saving hack. Crumble store-bought pound cake and mix with ready-to-use frosting.
What if I don’t want to use gel coloring?
Try natural alternatives like beet powder, turmeric, or matcha. They add both color and health benefits!
How do I avoid cracks in the coating?
Make sure the cake isn’t too cold when dipped, and avoid over-chilling the chocolate.
Can I double this recipe?
Easily! Just maintain the ratios and freeze in batches if freezer space is limited.